Create a chain-agnostic web3 wallet in Flutter
In this guide, we'll use the MetaMask Embedded Wallets SDK (formerly Web3Auth Plug and Play) to build your chain-agnostic Web3 wallet in Flutter. The wallet will support the Ethereum and Solana ecosystems.
You will create a demo app which supports user login, displays user details, and performs blockchain interactions. The signing of the blockchain transactions is done through the Embedded Wallets SDK.
See the Embedded Wallets management infrastructure for a high-level overview of the Embedded Wallets management infrastructure, architecture, and implementation. For those who want to skip straight to the code, find it on GitHub.
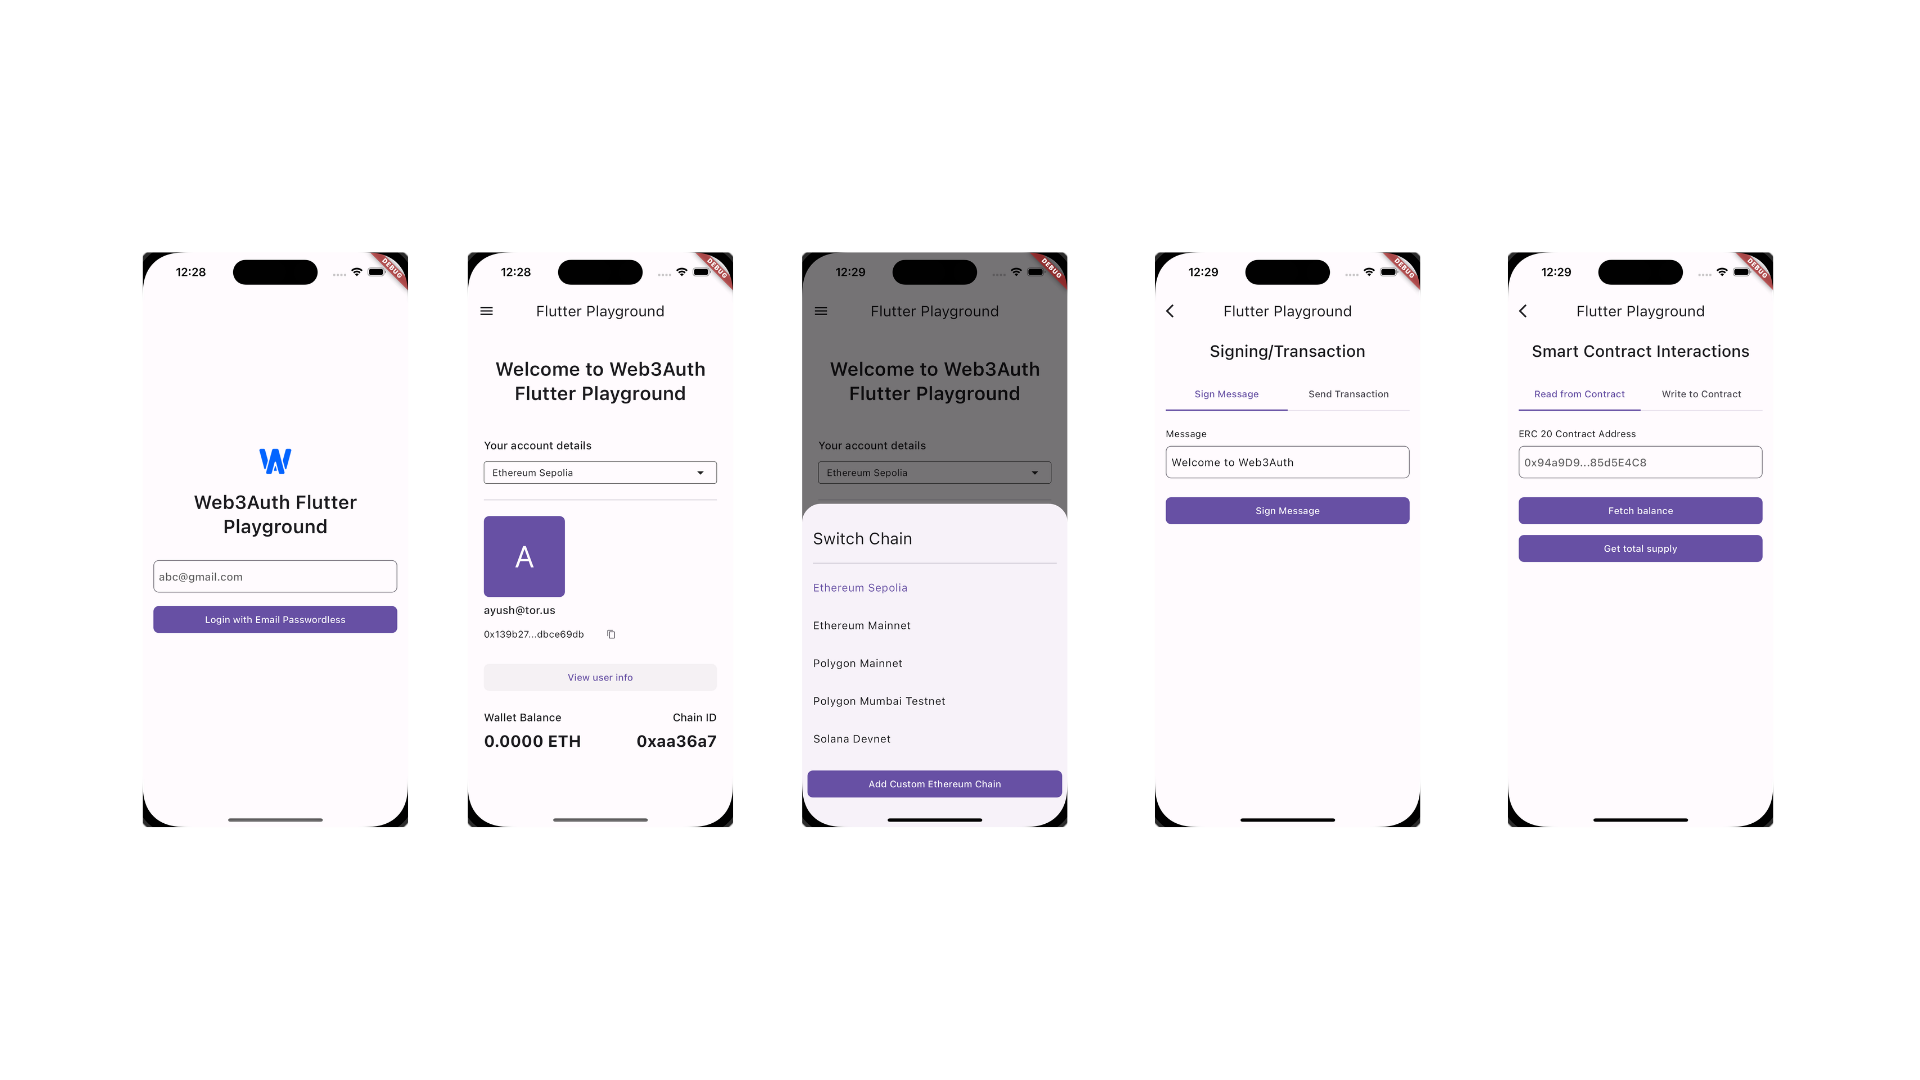
This is what your application will look like:
Step 1: Set up the Embedded Wallets dashboard
Sign up on the Embedded Wallets platform. It's free and gives you access to the Embedded Wallets' base plan. After the basic setup, explore other features and functionalities offered by the Embedded Wallets dashboard. It includes custom verifiers, whitelabeling, analytics, and more. Head to the Embedded Wallet documentation page for detailed instructions on setting up the dashboard.
Step 2: Integrate Embedded Wallets in Flutter
Once, you have set up your Embedded Wallets dashboard, and created a new project, it's time to integrate Web3Auth SDK in your Flutter application. For the implementation, we'll use the "web3auth_flutter package" to manage an Embedded Wallet in your Flutter application.
2.1 Installation
To install the web3auth_flutter package, you have two options. You can either manually add the package in the pubspec.yaml file, or you can use the flutter pub add command.
- Console
- Pubspec
Add web3auth_flutter using flutter pub add command.
flutter pub add web3auth_flutter
Add web3auth_flutter as a dependency to your pubspec.yaml.
dependencies:
  web3auth_flutter: ^6.1.2
2.2 Initialization
Next, initialize Web3Auth in your Flutter app. This sets up the necessary configurations using Client ID and prepares Web3Auth.
Future<void> main() async {
  WidgetsFlutterBinding.ensureInitialized();

  // Additional code

  final Uri redirectUrl;
  if (Platform.isAndroid) {
    redirectUrl =
        Uri.parse('w3aexample://com.example.flutter_solana_example/auth');
  } else {
    redirectUrl = Uri.parse('com.web3auth.fluttersolanasample://auth');
  }

  await Web3AuthFlutter.init(
    Web3AuthOptions(
      clientId: "YOUR_WEB3AUTH_CLIENT_ID", // Pass your Web3Auth Client ID, ideally using an environment variable
      network: Network.sapphire_mainnet,
      redirectUrl: redirectUrl,
    ),
  );

  await Web3AuthFlutter.initialize();

  runApp(const MainApp());
}
Learn more about Web3Auth initialization.
2.3 Session management
To check whether the user is authenticated, you can use the getPrivateKey or getEd25519PrivKey method. For an authenticated user, the result would be a non-empty string. You can navigate to different views based on the result. If the user is already authenticated, we'll navigate them to HomeScreen. In case of no active session, we'll navigate to LoginScreen to authenticate again.
class MainApp extends StatefulWidget {
const MainApp({super.key});
State<MainApp> createState() => _MainAppState();
}
class _MainAppState extends State<MainApp> {
late final Future<String> privateKeyFuture;
void initState() {
super.initState();
privateKeyFuture = Web3AuthFlutter.getEd25519PrivKey();
}
Widget build(BuildContext context) {
return MaterialApp(
home: FutureBuilder<String>(
future: privateKeyFuture,
builder: (context, snapshot) {
if (snapshot.connectionState == ConnectionState.done) {
if (snapshot.hasData) {
if (snapshot.data!.isNotEmpty) {
return const HomeScreen();
}
}
return const LoginScreen();
}
return const Center(
child: CircularProgressIndicator.adaptive(),
);
},
),
);
}
}
2.4 Authentication
If the user is not authenticated, you should utilize the login method. For the wallet, we will add two login options, Google, and Email Passwordless login. With Embedded Wallets, you can choose between a Single Page Authentication flow or a Regular Web Application flow. For this guide, we'll be using a Single Page Authentication flow. We'll create a helper function, _login inside LoginScreen. The login method is pretty straightforward in Embedded Wallets and takes LoginParams as input. After successfully logging in, we'll navigate the user to HomeScreen.
Learn more about Embedded Wallets' LoginParams.
class _LoginScreenState extends State<LoginScreen> with WidgetsBindingObserver {
// Additional Code
void didChangeAppLifecycleState(final AppLifecycleState state) {
// This is important to trigger the user cancellation on Android.
if (state == AppLifecycleState.resumed) {
Web3AuthFlutter.setCustomTabsClosed();
}
}
Widget build(BuildContext context) {
// Login View
}
Future<void> _login(BuildContext context) async {
try {
// Validate the form, and TextField. In case of invalid
// form state, return back.
if (!formKey.currentState!.validate()) {
return;
}
// It can be used to set the OAuth login options for corresponding
// loginProvider. For instance, you'll need to pass user's email address as
// login_hint when the Provider is email_passwordless.
await Web3AuthFlutter.login(
LoginParams(
loginProvider: Provider.email_passwordless,
mfaLevel: MFALevel.DEFAULT,
extraLoginOptions: ExtraLoginOptions(
login_hint: emailController.text,
),
),
);
// If login is successful, navigate user to HomeScreen.
if (context.mounted) {
Navigator.of(context).pushReplacement(
MaterialPageRoute(builder: (context) {
return const HomeScreen();
}),
);
}
} catch (e, _) {
if (context.mounted) {
showInfoDialog(context, e.toString());
}
}
}
}
Step 3: Set up blockchain providers
Next, we fetch the user details, retrieve their wallet address, and prepare blockchain providers for interactions. This guide supports the Ethereum and Solana ecosystems, but the general idea can be extended to any blockchain ecosystem.
Given that the project follows clean architecture and Test-Driven Development (TDD) principles, we'll want to create an abstract layer to interact with the blockchain providers. This abstraction simplifies expanding the blockchain support while isolating it from the rest of the application.
For interacting with Ethereum chains, we'll use the web3dart package. While for Solana, we'll use the Solana package. To install the packages, you have two options. You can either manually add the packages in the pubspec.yaml file, or you can use the flutter pub add command.
- Console
- Pubspec
Add web3dart and solana using flutter pub add command.
flutter pub add web3dart
flutter pub add solana
Add web3dart and solana as a dependency to your pubspec.yaml.
dependencies:
  web3dart: ^2.7.3
  solana: ^0.30.4
After successfully installing both packages, it's time to set up our Blockchain provider. First, we'll create a new class, ChainProvider, which will used as a base class for EthereumProvider and SolanaProvider. If you wish to support any additional ecosystem, you can extend the ChainProvider and implement the methods.
Learn how to integrate different blockchains with Embedded Wallets from the Connect Blockchain resources.
abstract class ChainProvider {
  Future<String> getBalance(String address);
  Future<String> sendTransaction(String to, double amount);
  Future<String> signMessage(String message);
  Future<dynamic> readContract(
    String address,
    String function,
    List<dynamic> params,
  );

  Future<dynamic> writeContract(
    String address,
    String function,
    List<dynamic> params,
  );
}
Typically, when interacting with blockchain providers, you'll only require the getBalance, sendTransaction, and signMessage.
3.1 Ethereum provider
Once we have our base class, we'll create EthereumProvider and implement the methods. To create the Web3Client instance, you'll require the RPC target URL. If you are using public RPCs, you can face some network congestion. It's ideal to use paid RPCs for production.
The readContract, and writeContract methods are used to interact with smart contracts on Ethereum ecosystem. The readContract is used to read the data from the smart contracts, while the writeContract is used to write data on smart contract.
class EthereumProvider extends ChainProvider {
final Web3Client web3client;
EthereumProvider({required String rpcTarget})
: web3client = Web3Client(
rpcTarget,
Client(),
);
Future<String> getBalance(String address) async {
final balance = await web3client.getBalance(
EthereumAddress.fromHex(address),
);
// The result from Web3Client is in wei, the smallest value. To convert
// the value to ether, you can divide it with 10^18, where 18 denotes the
// decimals for wei.
//
// For the sample, we'll use a helper function from web3dart package which
// has the same implementation.
return balance.getValueInUnit(EtherUnit.ether).toStringAsFixed(4);
}
Future<String> sendTransaction(String to, double amount) async {
final Credentials credentials = await _prepareCredentials();
final amountInWei = amount * pow(10, 18);
final Transaction transaction = Transaction(
to: EthereumAddress.fromHex(to),
value: EtherAmount.fromBigInt(
EtherUnit.wei,
BigInt.from(amountInWei),
),
);
final hash = await web3client.sendTransaction(
credentials,
transaction,
chainId: null,
fetchChainIdFromNetworkId: true,
);
return hash;
}
Future<String> signMessage(String message) async {
final Credentials credentials = await _prepareCredentials();
final signBytes = credentials.signPersonalMessageToUint8List(
Uint8List.fromList(message.codeUnits),
);
return bytesToHex(signBytes);
}
// Prepares the Credentials used for signing the message,
// and transaction on EVM chains. EVM ecosystem uses the
// secp256k1 curve. You can use the Web3AuthFlutter.getPrivKey
// to retrieve the secp256k1 compatible private key.
Future<Credentials> _prepareCredentials() async {
final privateKey = await Web3AuthFlutter.getPrivKey();
final Credentials credentials = EthPrivateKey.fromHex(privateKey);
return credentials;
}
Future<dynamic> readContract(
String address,
String function,
List<dynamic> params,
) async {
// For this sample, we are using the ERC 20 Contract. The same can be
// used for any of the EVM smart contract.
final contract = DeployedContract(
ContractAbi.fromJson(erc20Abi, 'Contract'),
EthereumAddress.fromHex(address),
);
final readFunction = contract.function(function);
final result = await web3client.call(
contract: contract,
function: readFunction,
params: params,
);
return result;
}
Future writeContract(String address, String function, List params) async {
// For this sample, we are using the ERC 20 Contract. The same can be
// used for any of the EVM smart contract.
final contract = DeployedContract(
ContractAbi.fromJson(erc20Abi, 'Contract'),
EthereumAddress.fromHex(address),
);
final writeFunction = contract.function(function);
final Credentials credentials = await _prepareCredentials();
final result = await web3client.sendTransaction(
credentials,
Transaction.callContract(
contract: contract,
function: writeFunction,
parameters: params,
),
chainId: null,
fetchChainIdFromNetworkId: true,
);
return result;
}
}
3.2 Solana provider
After EthereumProvider, it's time to extend ChainProvider and create SolanaProvider. For SolanaProvider, we'll only implement the getBalance, sendTransaction, and signMessage. We'll also add _generateKeyPair(), a helper method to create Ed25519HDKeyPair. It's used to sign the transactions and messages on Solana ecosystem. Since, Solana uses ed25519 curve, we can utilize the Web3AuthFlutter.getEd25519PrivKey.
class SolanaProvider extends ChainProvider {
final SolanaClient solanaClient;
SolanaProvider({required String rpcTarget, required String wss})
: solanaClient = SolanaClient(
rpcUrl: Uri.parse(rpcTarget),
websocketUrl: Uri.parse(wss),
);
Future<String> getBalance(String address) async {
final balanceResponse = await solanaClient.rpcClient.getBalance(
address,
);
/// We are dividing the balance by 10^9, because Solana's
/// token decimals is set to be 9;
return (balanceResponse.value / pow(10, 9)).toString();
}
Future<String> sendTransaction(String to, double amount) async {
final Ed25519HDKeyPair ed25519hdKeyPair = await _generateKeyPair();
/// Converting user input to the lamports, which are smallest value
/// in Solana.
final num lamports = amount * pow(10, 9);
final transactionHash = await solanaClient.transferLamports(
source: ed25519hdKeyPair,
destination: Ed25519HDPublicKey.fromBase58(to),
lamports: lamports.toInt(),
);
return transactionHash;
}
Future<String> signMessage(String message) async {
final Ed25519HDKeyPair ed25519hdKeyPair = await _generateKeyPair();
final signature = await ed25519hdKeyPair.sign(
ByteArray.fromString(message),
);
return signature.toBase58();
}
Future<Ed25519HDKeyPair> _generateKeyPair() async {
final privateKey = await Web3AuthFlutter.getEd25519PrivKey();
return await Ed25519HDKeyPair.fromPrivateKeyBytes(
privateKey: privateKey.hexToBytes.take(32).toList(),
);
}
Future<dynamic> readContract(
String address,
String function,
List<dynamic> params,
) {
// TODO: implement readContract
throw UnimplementedError();
}
Future writeContract(String address, String function, List params) {
// TODO: implement writeContract
throw UnimplementedError();
}
}
Step 4: Set up supported chains
Next, we define the supported chains with a chain_configs file that uses "list of map" to define the supported chains.
For the guide, we have added the support for Ethereum Sepolia, Ethereum Mainnet, Polygon Mainnet, Polygon Amoy, and Solana devnet. If you wish to support more chains in your wallet, add the config with the required details in the list below.
import 'package:web3auth_flutter/enums.dart';

final chainConfigs = [
  {
    "chainNamespace": ChainNamespace.eip155.name,
    "chainId": "0xaa36a7",
    "displayName": "Ethereum Sepolia",
    "ticker": "ETH",
    "rpcTarget": "https://rpc.sepolia.org",
    "blockExplorerUrl": "https://sepolia.etherscan.io",
    "logo": "https://web3auth.io/images/web3authlog.png",
    "wss": '',
  },
  {
    "chainNamespace": ChainNamespace.eip155.name,
    "chainId": "0x1",
    "displayName": "Ethereum Mainnet",
    "rpcTarget": "https://rpc.ethereum.org",
    "blockExplorerUrl": "https://etherscan.io",
    "ticker": "ETH",
    "logo": "https://web3auth.io/images/web3authlog.png",
    "wss": '',
  },
  {
    "chainNamespace": ChainNamespace.eip155.name,
    "chainId": "0x89",
    "rpcTarget": "https://polygon-rpc.com",
    "displayName": "Polygon Mainnet",
    "blockExplorerUrl": "https://polygonscan.com",
    "ticker": "POL",
    "logo": "https://web3auth.io/images/web3authlog.png",
    "wss": '',
  },
  {
    "chainNamespace": ChainNamespace.eip155.name,
    "chainId": "80002",
    "rpcTarget": "https://rpc-amoy.polygon.technology",
    "displayName": "Polygon Amoy Testnet",
    "blockExplorerUrl": "https://www.oklink.com/amoy",
    "ticker": "POL",
    "logo": "https://web3auth.io/images/web3authlog.png",
    "wss": '',
  },
  {
    "chainNamespace": ChainNamespace.solana.name,
    "chainId": "devnet",
    "rpcTarget": "https://api.devnet.solana.com",
    "displayName": "Solana Devnet",
    "blockExplorerUrl": "https://explorer.solana.com/?cluster=devnet/",
    "ticker": "SOL",
    "logo": "https://web3auth.io/images/web3authlog.png",
    "wss": "ws://api.devnet.solana.com"
  },
];
Next we create a new model ChainConfig, to represent the Dart object for the above chain config map. We'll use the ChainConfig model for UI purposes and chain interaction.
In the ChainConfig, we'll also add a isEVM parameter to help us differentiate the selected chain ecosystem. If isEVM is true for the selected chain, we can use EthereumProvider for chain interactions, or else we can use the SolanaProvider.
import 'package:flutter_playground/features/home/domain/entities/chain_config.dart';
import 'package:web3auth_flutter/enums.dart';

class ChainConfigModel extends ChainConfig {
  ChainConfigModel({
    required super.chainNamespace,
    required super.displayName,
    required super.ticker,
    required super.rpcTarget,
    required super.logo,
    required super.blockExplorerUrl,
    required super.chainId,
    required super.isEVMChain,
    required super.wss,
  });

  factory ChainConfigModel.fromJson(Map<String, String> json) {
    final nameSpace = ChainNamespace.values.byName(json['chainNamespace']!);
    final isEVM = nameSpace == ChainNamespace.eip155;
    return ChainConfigModel(
      isEVMChain: isEVM,
      chainNamespace: nameSpace,
      displayName: json['displayName']!,
      ticker: json['ticker']!,
      rpcTarget: json['rpcTarget']!,
      logo: json['logo'],
      blockExplorerUrl: json['blockExplorerUrl']!,
      chainId: json['chainId']!,
      wss: json['wss']!,
    );
  }
}
Step 5: Wallet implementation
Next we integrate the providers and supported chains into the wallet. For this guide, we are using the get_it package for service locator abilities. It will help us with the dependency injection.
5.1 Service locator
Let's create a new ServiceLocator class, and set up the ChainConfigDataSource and ChainConfigRepository. The ChainConfigRepository is responsible for converting the list of chain configs map we defined earlier into a list of ChainConfig models and inject into UI. As said earlier, for simplicity we are maintaining the list of chain configs on the frontend, but using ChainConfigRepository you can get the list from the server as well.
See the implementation of ChainConfigDataSource and ChainConfigRepository for more details.
class ServiceLocator {
  ServiceLocator._();

  static GetIt get getIt => GetIt.instance;

  static void setUp() {
    getIt.registerLazySingleton<ChainConfigDataSource>(
      () => ChainConfigDataSourceImpl(chainConfigs: chainConfigs),
    );

    getIt.registerLazySingleton<ChainConfigRepository>(
      () => ChainConfigRepositoryImp(getIt()),
    );
  }
}
After successfully setting up the ServiceLocator, initialize it in the main function above Web3AuthFlutter initialization.
void main() async {
  WidgetsFlutterBinding.ensureInitialized();
  ServiceLocator.setUp();

  // Additional Web3AuthFlutter initiation code.
}
5.2 Set up home provider
Next, create a ChangeNotifier to help us manage the state of the wallet. The notifier will help us manage the state of currently selected chain, and access the respective chain provider. For the state management, we will be using the provider package, so make sure to add provider as a dependency.
class HomeProvider with ChangeNotifier {
  late ChainConfig _selectedChain;
  late List<ChainConfig> _chains;
  late String _chainAddress;

  ChainConfig get selectedChain => _selectedChain;
  List<ChainConfig> get chains => _chains;
  String get chainAddress => _chainAddress;

  HomeProvider(List<ChainConfig> chains) {
    _selectedChain = chains.first;
    _chains = List.from(chains);
  }

  /// Update the selected chain
  void updateSelectedChain(ChainConfig chain) {
    _selectedChain = chain;
    notifyListeners();
  }

  /// Update the chain address for corresponding
  /// selected chain.
  void updateChainAddress(String address) {
    _chainAddress = address;
  }

  /// Add a new custom EVM chain on runtime.
  void addNewChain(ChainConfig newChain) {
    _chains.add(newChain);
    notifyListeners();
  }
}
To access the blockchain provider for currently selected chain, we will create a new extension on ChainConfig.
extension ChainConfigExtension on ChainConfig {
  ChainProvider prepareChainProvider() {
    if (isEVMChain) {
      return EthereumProvider(rpcTarget: rpcTarget);
    } else {
      return SolanaProvider(rpcTarget: rpcTarget, wss: wss);
    }
  }
}
5.3 Setting up the home screen
Next, we create a new HomeScreen widget to show user details as email address, wallet address, user's balance for selectedChain, and blockchain interaction methods. We'll retrieve the ChainConfigRepository using ServiceLocator, and initialize our HomeProvider.
To get the user's balance, we'll use prepareAccount method from the ChainConfigRepository. The method internally uses ChainProvider to retrieve user's wallet address, and fetch the wallet balance for the address. Checkout ChainConfigRepository implementation for more details. The methods returns Account object which has the above details.
See the Account data model below:
class Account {
  final Ed25519HDKeyPair? solanaKeyPair;
  final Credentials? ethereumKeyPair;
  final String balance;
  final String publicAddress;

  Account({
    this.solanaKeyPair,
    this.ethereumKeyPair,
    required this.balance,
    required this.publicAddress,
  });
}
Once, we have retrieve the ChainConfigRepository in init method of HomeScreen, we'll invoke the prepareAccount, and pass the Account instance to StreamController which is used for data flow in the application.
class HomeScreen extends StatefulWidget {
const HomeScreen({super.key});
State<HomeScreen> createState() => _HomeScreenState();
}
class _HomeScreenState extends State<HomeScreen> {
late final ChainConfigRepository chainConfigRepository;
late final TorusUserInfo userInfo;
late final StreamController<Account> streamController;
late final HomeProvider homeProvider;
void initState() {
super.initState();
chainConfigRepository = ServiceLocator.getIt<ChainConfigRepository>();
streamController = StreamController<Account>();
homeProvider = Provider.of<HomeProvider>(
context,
listen: false,
);
loadAccount(false);
}
void dispose() {
super.dispose();
}
// loadAccount function is used to fetch the account
// details such as balance, user address, and private key
// for currently selected chain.
Future<void> loadAccount(bool isReload) async {
if (!isReload) {
userInfo = await Web3AuthFlutter.getUserInfo();
}
final account = await chainConfigRepository.prepareAccount(
homeProvider.selectedChain,
);
homeProvider.updateChainAddress(account.publicAddress);
// We streamController to control data flow in the application.
streamController.add(account);
}
Widget build(BuildContext context) {
return Scaffold(
appBar: AppBar(
title: const Text(StringConstants.appBarTitle),
),
drawer: const SideDrawer(),
body: Padding(
padding: const EdgeInsets.symmetric(horizontal: 24.0, vertical: 16),
child: StreamBuilder<Account>(
stream: streamController.stream,
builder: (context, snapShot) {
// Check if the AsyncSnapshot is in active connection,
// and if it's true, build the UI.
if (snapShot.connectionState == ConnectionState.active) {
return SingleChildScrollView(
child: Column(
crossAxisAlignment: CrossAxisAlignment.start,
children: [
const SizedBox(height: 24),
const HomeHeader(),
const SizedBox(height: 12),
// Helps users to switch chain in the wallet.
ChainSwitchTile(
onSelect: (chainConfig) {
homeProvider.updateSelectedChain(chainConfig);
loadAccount(true);
},
),
const SizedBox(height: 16),
const Divider(),
const SizedBox(height: 16),
// Displays user details, such as email,
// user name, and logo.
AccountDetails(
userInfo: userInfo,
account: snapShot.requireData,
),
const SizedBox(height: 24),
Consumer<HomeProvider>(builder: (
_,
homeProvider,
__,
) {
final chain = homeProvider.selectedChain;
// Displays user balance.
return BalanceWidget(
balance: snapShot.data!.balance,
ticker: chain.ticker,
chainId: chain.chainId,
);
}),
const SizedBox(height: 16),
Consumer<HomeProvider>(builder: (_, __, ___) {
return Column(
children: [
CustomTextButton(
onTap: () {
_navigationToScreen(
context,
const TransactionsScreen(),
);
},
text: 'Transaction',
),
// Disable the SmartContractInteractionScreen for
// non evm chains.
if (homeProvider.selectedChain.isEVMChain) ...[
const SizedBox(height: 16),
CustomTextButton(
onTap: () {
_navigationToScreen(
context,
const SmartContractInteractionScreen(),
);
},
text:
StringConstants.smartContractInteractionsText,
),
]
],
);
}),
],
),
);
}
return const Center(child: CircularProgressIndicator.adaptive());
},
),
),
);
}
// Helper function to navigate to different screens.
void _navigationToScreen(BuildContext context, Widget screen) {
Navigator.of(context).push(MaterialPageRoute(builder: (_) {
return screen;
}));
}
}
In HomeScreen we'll also give users an option to logout from the wallet in navigation drawer. To do so, we'll utilize the Web3AuthFlutter.logout. Upon success, we'll navigate users back to LoginScreen. Checkout SideDrawer widget for navigation drawer implementation.
5.4 Chain interactions
Next, set up chain interactions for signing message, signing transaction, reading from contracts, and writing on contracts. For signing messages and transactions, we'll create a new TransactionsScreen widget and utilize signMessage and sendTransaction from ChainProvider for respective functionality.
To retrieve currently selected chain, and respective provider we'll use the HomeProvider.
class TransactionsScreen extends StatefulWidget {
const TransactionsScreen({super.key});
State<TransactionsScreen> createState() => _TransactionsScreenState();
}
class _TransactionsScreenState extends State<TransactionsScreen> {
// Additional variable initiation
void initState() {
super.initState();
selectedChain = context.read<HomeProvider>().selectedChain;
chainProvider = selectedChain.prepareChainProvider();
// Additional code
}
Widget build(BuildContext context) {
// Additiona UI code.
// Checkout GitHub repo for full code.
}
Future<void> _signMessage(BuildContext context) async {
try {
showLoader(context);
final signature = await chainProvider.signMessage(
signMessageTextController.text,
);
if (context.mounted) {
removeDialog(context);
showInfoDialog(context, signature);
}
} catch (e, _) {
log(e.toString(), stackTrace: _);
if (context.mounted) {
removeDialog(context);
showInfoDialog(context, e.toString());
}
}
}
Future<void> _sendTransaction(BuildContext context) async {
try {
showLoader(context);
final amount = double.parse(amountTextController.text);
final hash = await chainProvider.sendTransaction(
destinationTextController.text,
amount,
);
if (context.mounted) {
removeDialog(context);
showInfoDialog(context, hash);
}
} catch (e, _) {
log(e.toString(), stackTrace: _);
if (context.mounted) {
removeDialog(context);
showInfoDialog(context, e.toString());
}
}
}
}
Next steps
Congratulations, you have build a chain agnostic Web3 wallet. This guide only gives you an overview of how to create your wallet with EVM and Solana ecosystem support. The general idea of the guide can be used for any of the blockchain ecosystem.
- Learn more about Embedded Wallets, checkout our documentation for Flutter.
- Find the code used for the guide on our examples repo.